To create this cluster we will need three virtual machines although only two will be used for the database. Machines will be Centos v7 although not much is changed if using Centos v8:
pg1.localdomain 192.168.122.21
pg2.localdomain 192.168.122.22
VIP address will be 192.168.122.200
To install software first add repositories on both nodes:
# sudo yum install -y https://download.postgresql.org/pub/repos/yum/reporpms/EL-7-x86_64/pgdg-redhat-repo-latest.noarch.rpm

# tee /etc/yum.repos.d/timescale_timescaledb.repo <<EOL
[timescale_timescaledb]
name=timescale_timescaledb
baseurl=https://packagecloud.io/timescale/timescaledb/el/$(rpm -E %{rhel})/\$basearch
repo_gpgcheck=1
gpgcheck=0
enabled=1
gpgkey=https://packagecloud.io/timescale/timescaledb/gpgkey
sslverify=1
sslcacert=/etc/pki/tls/certs/ca-bundle.crt
metadata_expire=300
EOL
Update packages and install software on both nodes:
# yum update -y

# yum install -y timescaledb-2-postgresql-13
We also need to add repository (Extras) and install etcd on both database nodes and another extra, we used a node running grafana:
# yum install -y etcdUpdate configuration in /etc/etcd/etcd.conf on pg1 – we must use IP addresses:
name: etcd1
data-dir: /var/lib/etcd
listen-peer-urls: http://192.168.122.21:2380
listen-client-urls: http://localhost:2379,http://192.168.122.21:2379
initial-advertise-peer-urls: http://192.168.122.21:2380
advertise-client-urls: http://192.168.122.21:2379
initial-cluster: etcd1=http://192.168.122.21:2380,etcd2=http://192.168.122.22:2380,etcd3=http://192.168.122.23:2380
initial-cluster-token: pg-cluster1
initial-cluster-state: new
enable-v2: true
Update configuration on pg2:
name: etcd2
data-dir: /var/lib/etcd
listen-peer-urls: http://192.168.122.22:2380
listen-client-urls: http://localhost:2379,http://192.168.122.22:2379
initial-advertise-peer-urls: http://192.168.122.22:2380
advertise-client-urls: http://192.168.122.22:2379
initial-cluster: etcd1=http://192.168.122.21:2380,etcd2=http://192.168.122.22:2380,etcd3=http://192.168.122.23:2380
initial-cluster-token: pg-cluster1
initial-cluster-state: new
enable-v2: true
Update configuration on the third node too:
name: etcd3
data-dir: /var/lib/etcd
listen-peer-urls: http://192.168.122.23:2380
listen-client-urls: http://localhost:2379,http://192.168.122.23:2379
initial-advertise-peer-urls: http://192.168.122.23:2380
advertise-client-urls: http://192.168.122.23:2379
initial-cluster: etcd1=http://192.168.122.21:2380,etcd2=http://192.168.122.22:2380,etcd3=http://192.168.122.23:2380
initial-cluster-token: pg-cluster1
initial-cluster-state: new
enable-v2: true
You can now start etcd on all nodes and then change initial-cluster-state from new to existing.
### if you don't use systemd:
/root/etcd/etcd --config-file /etc/etcd/etcd.conf

### or you can create your own /etc/systemd/system/etcd.service
[Unit]
Description=etcd key-value store
Documentation=https://github.com/etcd-io/etcd
After=network-online.target local-fs.target remote-fs.target
Wants=network-online.target local-fs.target remote-fs.target

[Service]
User=etcd
Type=simple
Environment=ETCD_DATA_DIR=/var/lib/etcd
ExecStart=/usr/local/bin/etcd --config-file /etc/etcd/etcd.conf
StandardOutput=syslog
StandardError=syslog
SyslogIdentifier=etcd
Restart=always
RestartSec=10s
LimitNOFILE=40000

[Install]
WantedBy=multi-user.target
Next we have to install patroni on both database nodes:
### First the prerequisites
yum install net-tools python3 gcc python3-devel psycopg2

# pip3 install --upgrade setuptools
# pip3 install python-etcd
# pip3 install psycopg2-binary
# pip3 install patroni
If you need to you can create your own /etc/systemd/system/patroni.service
[Unit]
Description=Runners to orchestrate a high-availability PostgreSQL
After=syslog.target network.target etcd.service

[Service]
Type=simple
User=postgres
Group=postgres
ExecStart=/bin/patroni /etc/patroni.yml
StandardOutput=syslog
StandardError=syslog
SyslogIdentifier=patroni
KillMode=process
TimeoutSec=30
Restart=no
LimitNOFILE=10000

[Install]
WantedBy=multi-user.target
Create or update /etc/patroni.yml on both nodes (adjust IP addresses for pg2):
scope: postgres
name: pg01
level: INFO
dir: /var/log/patroni

restapi:
    listen: 192.168.122.21:8008
    connect_address: 192.168.122.21:8008

etcd:
    host: 192.168.122.21:2379

bootstrap:
    dcs:
        ttl: 30
        loop_wait: 10
        retry_timeout: 10
        maximum_lag_on_failover: 1048576
        postgresql:
            use_pg_rewind: true
            use_slots: true
            parameters:

    initdb:
    - encoding: UTF8
    - data-checksums

    pg_hba:
    - host replication replicator 127.0.0.1/32 md5
    - host replication replicator 192.168.122.21/0 md5
    - host replication replicator 192.168.122.22/0 md5
    - host all all 0.0.0.0/0 md5

    users:
        admin:
            password: PASSW0RD
            options:
                - createrole
                - createdb

postgresql:
    listen: 192.168.122.21:5432
    bin_dir: /usr/pgsql-13/bin
    connect_address: 192.168.122.21:5432
    data_dir: /var/lib/pgsql/13/data/
    pgpass: /app/pgsql/pgpass
    authentication:
        replication:
            username: replicator
            password: PASSW0RD
        superuser:
            username: postgres
            password: PASSW0RD
    parameters:
        unix_socket_directories: '.'

tags:
    nofailover: false
    noloadbalance: false
    clonefrom: false
    nosync: false
You should now be able to start patroni which in turn should create the database instance. First start it on pg1, wait for it to succeed then start on pg2:
### command to check status:
[root@pg2 etc]# patronictl -c /usr/local/etc/patroni.yml list member postgres
+ Cluster: member (uninitialized) --+-----------+
| Member | Host | Role | State | TL | Lag in MB |
+--------+------+------+-------+----+-----------+
+--------+------+------+-------+----+-----------+
+ Cluster: postgres (6925420485239186222) ----+----+-----------+
| Member | Host           | Role    | State   | TL | Lag in MB |
+--------+----------------+---------+---------+----+-----------+
| pg01   | 192.168.122.21 | Leader  | running |  1 |           |
| pg02   | 192.168.122.22 | Replica | running |  1 |         0 |
+--------+----------------+---------+---------+----+-----------+
You can now connect to pg1 and create a database: (we will create a timescaledb database):
[root@pg1 data]# psql -U postgres -W -h pg1
Password:
psql (12.5)
Type "help" for help.

postgres=# create database timescle;
CREATE DATABASE
postgres=# \c timescle;
Password:
You are now connected to database "timescle" as user "postgres".
timescle=# create extension if not exists timescaledb;
WARNING:
WELCOME TO
 _____ _                               _     ____________
|_   _(_)                             | |    |  _  \ ___ \
  | |  _ _ __ ___   ___  ___  ___ __ _| | ___| | | | |_/ /
  | | | |  _ ` _ \ / _ \/ __|/ __/ _` | |/ _ \ | | | ___ \
  | | | | | | | | |  __/\__ \ (_| (_| | |  __/ |/ /| |_/ /
  |_| |_|_| |_| |_|\___||___/\___\__,_|_|\___|___/ \____/
We need to install HAproxy on both nodes to be able to always connect to master database:
yum install haproxy

### update /etc/haproxy/haproxy.cfg
global
        maxconn 1000
        log     127.0.0.1:514 local2

defaults
        log global
        mode tcp
        retries 2
        timeout client 30m
        timeout connect 4s
        timeout server 30m
        timeout check 5s

listen stats
        mode http
        bind *:7070
        stats enable
        stats uri /

listen postgres
        bind *:5000
        option httpchk GET /patroni HTTP/1.0
        http-check expect rstring \"role\":\ \"master\"
        default-server inter 3s fall 3 rise 2 on-marked-down shutdown-sessions
        server postgresql_pg01_5432 192.168.122.21:5432 maxconn 1000 check port 8008
        server postgresql_pg02_5432 192.168.122.22:5432 maxconn 1000 check port 8008
In case you didn’t disable SELinux you will have to set up some extra rules:
semanage port -a -t PORT_TYPE -p tcp 7070
setsebool -P nis_enabled 1
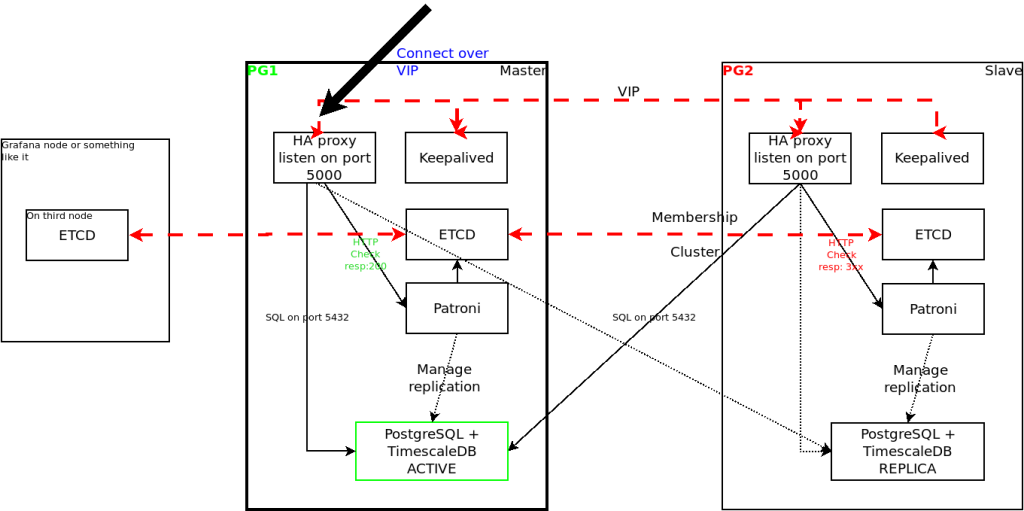
setsebool -P haproxy_connect_any 1Start haproxy on both servers and from now on you should access the database on port 5000 and you will be automatically redirected to the master database. We still need to install keepalived and configure it to raise a VIP address we will use to connect which will be available even if pg1 machine is down.
yum install keepalived

### update configuration in /etc/keepalived/keepalived.conf

vrrp_script chk_haproxy {
  script " /opt/scripts/check_haproxy.sh"
  interval 2 # every 2 seconds
  weight 2 # add 2 points if OK
}

vrrp_instance VI_1 {
  interface ens224 # interface to monitor
  state MASTER # MASTER on ha1, BACKUP on ha2
  virtual_router_id 51
  priority 101 # 101 on pg1, 100 on pg2
  virtual_ipaddress {
    192.168.122.200 # virtual ip address
  }
  track_script {
    chk_haproxy
  }
}
On pg2 change state to BACKUP and priority to 100. Create check_haproxy.sh script:
#!/bin/sh
set -e

/usr/bin/killall -0 haproxy
This script will return error if haproxy isn’t up and nothing if the process is up and running. We should now connect to the database using VIP and port 5000. To control the cluster use patronictl command as previously showed:
### status
patronictl -c /etc/patroni.yml show members postgres

# restart node
patronictl -c /etc/patroni.yml restart postgres pg01

# manual failover
patronictl -c /etc/patroni.yml failover postgres